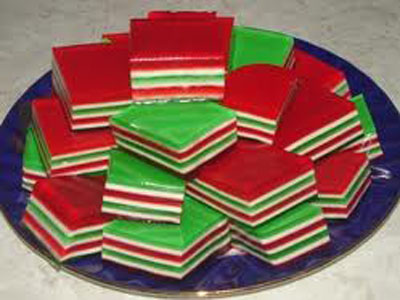
Christmas Finger Jello
This is a really fun thing to make! It’s a Christmas version of the classic “Finger Jello” recipe. Sure to be a hit with children; you can use the colors of the holiday you are celebrating to make jello
INGREDIENTS:
- 3 boxes Cherry Or Strawberry Jelly (3 Ounces Each)
- 2 boxes Lime Jelly (3 Ounces Each)
- 2 cans Sweetened Condensed Milk (14 Ounces Each)
- 9 envelopes Plain Knox Gelatin
- Nonstick Cooking Spray
METHOD:
- First: Get organized! Having a tea kettle full of water helps, as does having at least two or three mixing bowls and a couple of glass measuring cups. This moves faster if you have all the equipment ready!
- Second: Spray a 9 x 13 inch Pyrex with cooking spray, then give it a gentle wipe with a paper towel to remove the excess.
COLORED JELLY LAYERS:
One layer at a time, mix 1 envelope Knox gelatin with 1/4 cup cold water in a small mixing bowl. Add 1 cup boiling water, followed by 1 box of either red or green jello. Stir gently to combine so bubbles won’t form. Pour into pan. Place in the fridge for 10-15 minutes, or until set. In between each colored layer, pour a creamy layer.
CREAMY WHITE LAYERS:
NOTE: The following mixture is enough for just under three creamy layers. You’ll need two batches before the whole thing’s done.
In a small glass measuring cup, measure 1/2 cup cold water. Stir in 2 envelopes of plain jello and stir to dissolve. Pour sweetened condensed milk into a medium-sized mixing bowl. Add 1 cup of boiling water. Pour dissolved gelatin mixture into the condensed milk mixture, then add another 1/2 cup of boiling water.
Once you’ve used all of the creamy mixture, repeat the method below to make another batch.
INSTRUCTIONS:
- Begin by pouring either a red layer in the bottom of the pan. Stick the pan in the fridge for 10-15 minutes until it’s set. While it’s setting, mix up the first batch of the creamy mixture.
- Remove the pan from the fridge and pour in a little more than 1/3 of the creamy mixture (or enough to coat the first colored layer.) Stick the pan in the fridge for 10-15 minutes until it’s set. While it’s setting, mix up the next colored layer.
- Repeat the colored layer process with a green layer, followed by another creamy layer. When you’re finished, you should have, beginning from the bottom:
Red
White
Green
White
Red
White
Green
White
Red
- Note that you’ll need to mix up the second batch of the creamy layer midway through the process to make sure you have enough for the middle layer. For the colored layers, just mix them right before you need them (when the previous layer is chilling in the fridge).
- When all the layers are in the pan, chill for a good 2 hours to totally set everything. Cut into small squares and serve ’em as snacks!